After a lot of experimenting, I think I finally figured out the best way to convert a large set of images into a high-resolution timelapse video. I'll outline three methods here, each using a different piece of software: Windows Movie Maker, Apple QuickTime Pro, and mencoder. All three do essentially the same thing, but with differing file formats and control over parameters. Feel free to use whichever suits your needs best. When taking the images, be sure to put your camera's image size to an appopriate setting. I never make my videos larger than 1280 pixels on the largest side, so a picture size of much larger than that is only going to take up disk space and slow down the timelapse creation process.
There was an error in the mencoder code that caused every timelapse to be created at 30fps. That has been fixed. 2/28/2010
Movie Maker - QuickTime - mencoder
Windows Movie Maker
This is the method by which I made my first timelapse videos. It's nice for two reasons: 1) all Windows computers these days have Movie Maker preloaded and 2) it's a no-brainer to use. However, there are a few tricks to more or less optimize Movie Maker for timelapse videos.
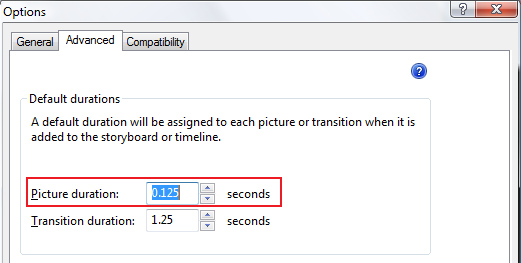
The first thing you have to do is change the display time for each picture in a "slideshow." We'll be setting up a sort of slideshow with very little time and no transition between images, which is really all a video is anyways. Go into Tools > Options in Movie Maker and navigate to the Advanced tab. There is a field called Picture duration which changes how long each still image is displayed in a video. Go ahead and change that to the minimum value of 1/8 second, or 0.125.
Now that the software is set up properly, import all your images into Movie Maker. You can do this a number of ways, but the easiest is to look in the left sidebar, and choose Pictures from the Import heading. Select all your imported images, and drag them over to the flimstrip at the bottom. It will likely take a while to load all your pictures, but it should get there eventually. Actually, it will probably look frozen, which seems to be the commonality between all Microsoft programs...
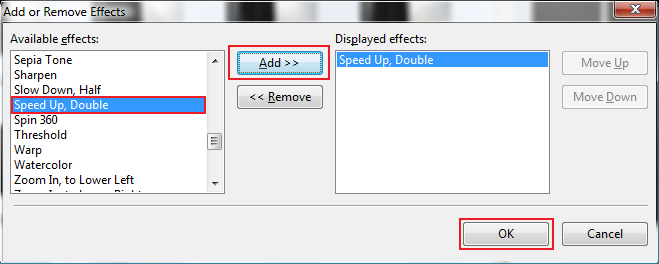
Anyways, when that's all done, you can go ahead and export your movie as a WMV file. Yea...nothing's really compatible with WMV, but that's what you're stuck with, unfortunately. Do that by going to the left sidebar and choosing Publish to > This Computer. There are some export options, but I've found the defaults to be best. You may find that your timelapse is not playing fast enough. The main problem with using Windows Movie Maker is that you are limited to a playback rate of one picture ever 1/8 second, or 8 frames per second (fps). If you need slower playback, it's easy to go back and change the default picture display time. However, if you need to speed up playback, the easiest thing to do is import your newly-made video back into Movie Maker, and then apply a "Twice as fast" filter. Do this by dragging your video onto the filmstrip, right clicking on the video in the strip, and selecting Effects from the menu. In the dialog box, scroll down to "Speed Up, Double" and add it to the filter list. Export this as a new video, and you're all set! Again, not much control, but with some math, you should be able to get the framerate you want.
QuickTime Pro
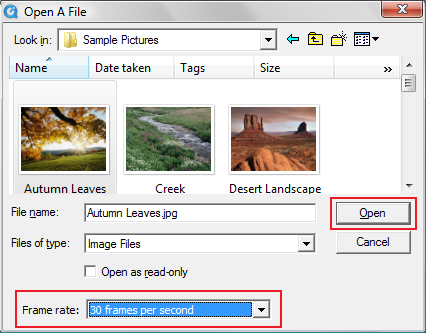
This second method is also very easy. The downside is the cost--Quictime Pro costs $30 when downloading it from Apple's Website. If you've got QuickTime Pro, let's get started! With QuickTime open, go to File > Open Image Sequence. Navigate to the folder with all your images, and select any of the images. QuickTime will take all the pictures in that folder, regardless of which image you choose. This is important to know if you have some other, non-timelapse-related pictures in that folder--be sure to move those somewhere else first! This is also where you choose the framerate of the video. The options are limited, but not nearly as much as in Windows Movie Maker.
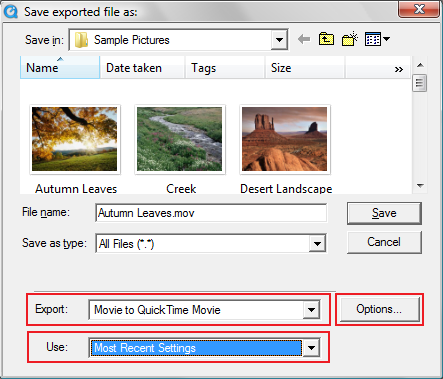
Whereas Windows Movie Maker appears frozen when it's compiling the video, QuickTime just looks as if it is doing...nothing. Trust that it's working hard, and eventually your video will show up. The movie is not in a finished state right now, and you may have a hard time playing it, because each frame is full-size, uncompresed quality. So, the next step is to export your video as a MOV movie file, which is a pretty widely-used format. In the movie window, select File > Export and choose Movie to QuickTime Movie for Export: in the resulting dialog window. Choose Most Recent Settings for Use: and click on the Options button.
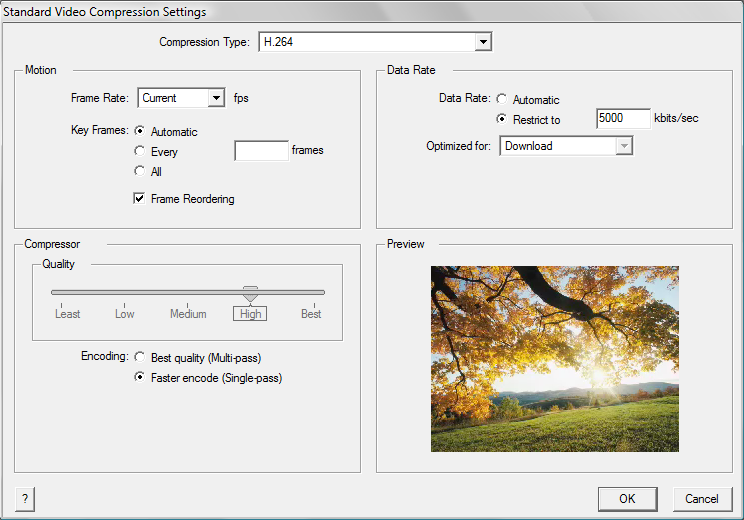
The specific settings can be changed to suit your needs, but I've found the below settings to be best for me. When you click Settings, you will see a sort of summary window of the current export settings. Click on Settings to open up the window below. I like the H.264 compressor for it's relative high quality and low filesize. A data rate of 5000 kbits/sec seems to work great, with very few compression artifacts. I use Single-pass encoding. You could do Multi-pass encoding, but that just takes longer and the quality increase isn't really perceptible.
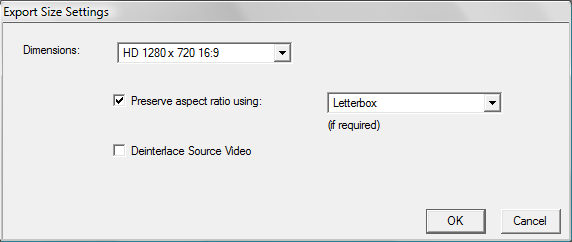
The last thing to change is the size of the exported movie. After accepting the compression settings, click on Size in the export summary window. I use a high definition size of 1280 x 720 pixels and use letterboxing to keep my movie from looking squished when it is converted to a 16:9 aspect ratio.
Once your settings are all set, you can go ahead and export the video for future consumption! These settings should allow you to upload a nice-quality HD video on vimeo
mencoder
This is definitely the most difficult of all the options, but it gives you the most control over the most settings. You should have some familiarity with a command line interface to use mencoder. This is a free, open-source solution that I personally use for all my timelapses now. I use it on Windows, but it works just as well on other operating systems. You can download mplayer (open source video player)/mencoder from the mencoder website, but I found that sometimes it is difficult to get the codecs setup. So, you can download the version of mencoder I use (with codecs), just be aware that this download is static and is probably not the most recent version of mencoder:
Download mencoder for these tutorials (20Mb).
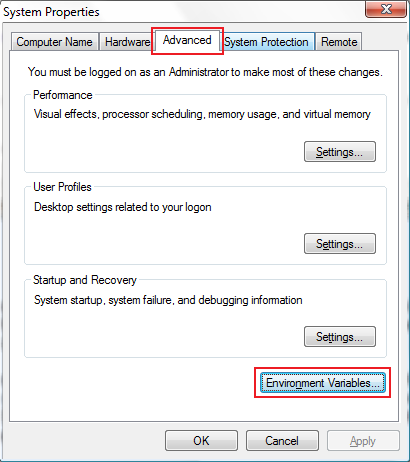
Once you have mencoder (comes with mplayer) installed, you need to edit your system PATH variable so that you can access mencoder from the command line. You can do this in Windows Vista by going into the advanced system properties. For other operating systems, search online for editing the path variable--it should be similar. There should be a tab named Advanced, and from there you can click on Environment Variables. Edit the System Variable called Path, and add this onto the end of the path: ;C:\Program Files\MPlayer (or wherever you put the mplayer folder). Now that Windows knows to look for mencoder in the MPlayer filepath, you're ready to run mencoder from the command line.
Mencoder works with a set of parameters that need to be properly set up. To save you time, I have the mencoder parameters I use to create timelapses below:
mencoder mf://*.jpg -mf fps=%framerate%:type=jpeg -noskip -of lavf -lavfopts format=mov -ovc lavc -lavcopts vglobal=1:coder=0:vcodec=libx264:vbitrate=%bitrate% -vf eq2=1.2:0.9:0.0:1.0,scale=1280:-2 -o %outfile%.mov
You should replace %framerate% with your desired framerate (I've found anything less than 120 to be ok), %bitrate% to your desired bit rate in kbits/sec (I like to use 5000), and %outfile% with the name for your exported video. You should type this into the command line while you are in the directory with all your timelapse images. You could instead give an aboslute path to your pictures, but *.jpg is eaiser for me. The above code will load all jpg files in the current directory into an MOV file, encoded with h.264. It will scale the video to 1280 pixels wide, but it will not letterbox or crop the images to create a video 720 pixels high. For those, refer to the below code (note the changes near the end).
Letterboxing
mencoder mf://*.jpg -mf fps=%framerate%:type=jpeg -noskip -of lavf -lavfopts format=mov -ovc lavc -lavcopts vglobal=1:coder=0:vcodec=libx264:vbitrate=%bitrate% -vf eq2=1.2:0.9:0.0:1.0,expand=aspect=16/9,scale=1280:720 -o %outfile%.mov
Cropping
mencoder mf://*.jpg -mf fps=%framerate%:type=jpeg -noskip -of lavf -lavfopts format=mov -ovc lavc -lavcopts vglobal=1:coder=0:vcodec=libx264:vbitrate=%bitrate% -vf eq2=1.2:0.9:0.0:1.0,scale=1280:-2,crop=1280:720 -o %outfile%.mov
Instead of having to remember this extremely long set of parameters to type into the command line every time I want to make a timalapse, I wrote a simple batch program to do it for me. The batch program will run under Windows, from the command line. Save the below code into a batch file (.bat) with your favorite text editor--I called mine jpgs2mov.bat.
download this batch file
@echo off
set /p framerate= Enter the framerate of the timelapse video (frames/sec).
set /p bitrate= Enter the bitrate of the timelapse video (5000 seems good) (kbit/sec).
set /p crop= Enter 0 to preserve aspect ratio, 1 to crop, or 2 to letterbox(16:9).
set /p outfile= Enter the video output filename (omit .mov).
if %crop% == 0 goto none
if %crop% == 1 goto crop
if %crop% == 2 goto letterbox
:none
mencoder mf://*.jpg -mf fps=%framerate%:type=jpeg -noskip -of lavf -lavfopts format=mov -ovc lavc -lavcopts vglobal=1:coder=0:vcodec=libx264:vbitrate=%bitrate% -vf eq2=1.2:0.9:0.0:1.0,scale=1280:-2 -o %outfile%.mov
goto end
:crop
mencoder mf://*.jpg -mf fps=%framerate%:type=jpeg -noskip -of lavf -lavfopts format=mov -ovc lavc -lavcopts vglobal=1:coder=0:vcodec=libx264:vbitrate=%bitrate% -vf eq2=1.2:0.9:0.0:1.0,scale=1280:-2,crop=1280:720 -o %outfile%.mov
goto end
:letterbox
mencoder mf://*.jpg -mf fps=%framerate%:type=jpeg -noskip -of lavf -lavfopts format=mov -ovc lavc -lavcopts vglobal=1:coder=0:vcodec=libx264:vbitrate=%bitrate% -vf eq2=1.2:0.9:0.0:1.0,expand=aspect=16/9,scale=1280:720 -o %outfile%.mov
gotoend
:end
vlc %outfile%.mov --loop
This program saves the output file to the current directory. If you have VLC media player, and you add the location of vlc.exe to the PATH variable, then the video will automatically play when it is finished. Also, if you add the directory where you save this batch file to the PATH variable, you can call upon it at any time from the command line by simply typing jpgs2mov. The program will prompt you for a framerate, bitrate, aspect ratio setting, and filename, after which, it will run the appropriate mencoder code!
Hopefully, one of the three tutorials above suceeded, and you now have a beautiful timelapse video to show everyone. If you are having some troubles, don't hesitate to send me an email - my address is right down there in the footer.